![]()
Table Backgrounds
You can specify a background color or image for your table.
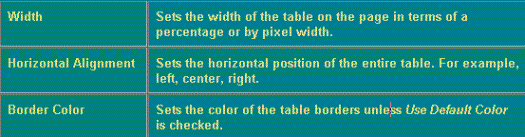
Specifying a Table’s Background Color
You can assign a background color to a table to give it more visual appeal. Here is an example.
To assign a background color to your table, follow these steps.
1. Place the cursor within the table.
2. Right click the mouse.
3. Select Set Table Properties.
4. Click the Table Properties tab.
5. Click the Background dropdown list.
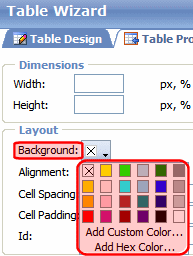
6. A selection of colors appears. Click a color for the table’s background.
From the dropdown, you can add custom colors by selecting a color patch or entering a color’s hex value. Follow these steps to get help on how to use the color box.
Note: The custom colors box is only available with Internet Explorer. If you are using Firefox or Google Chrome, you can enter a custom color by its hexadecimal value.
1. Click the question mark in the top right corner.
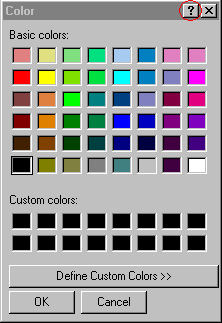
2. A large question mark appears next to your cursor.
3. Drag the question mark to the area of the dialog box that you want to learn about.
4. Click the mouse. A box appears with instructions for that area.
Deleting a Table’s Background Color
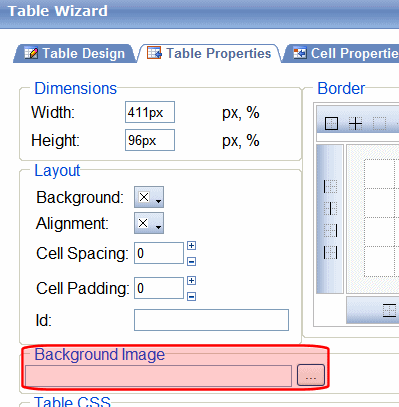
To delete a table’s background color, click the Background dropdown list on the Table Properties tab of the Table Wizard.
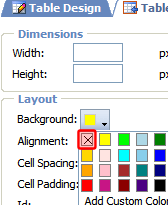
Then, click the top left choice (circled above).
Specifying a Table Row’s Background Color
To assign a background color to a table row, follow these steps.
1. Place the cursor within the table.
2. Right click the mouse.
3. Select Set Table Properties.
4. Click the Cell Properties tab.
5. Within the Table Wizard dialog, hold down the <Ctrl> key while clicking all cells in the row. In the following illustration, the second row from the top is selected (dark gray).
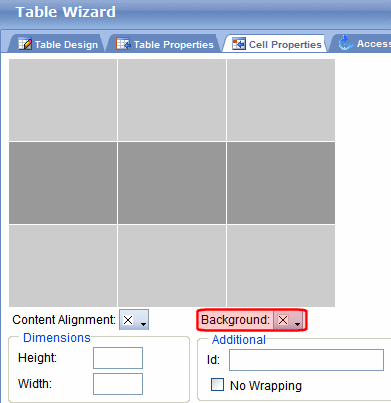
6. Click the Background dropdown list (circled above).
7. A selection of colors appears. Click a color for the table’s background.
8. Click OK.
Specifying a Table’s Background Image
You can specify a background image for your table. Here is an example.

Note that when you apply a background image to a table
if the table is larger than the image, the image repeats until it fills the table.
if the image is larger than the table, the top left corner of the image aligns with the top left corner of the table. The rest of the image fills as much of the table as possible.
you can also apply an image to individual cells (see Specifying a Background Image for a Cell).
make sure the image does not obscure the table’s legibility
See Steps for Inserting a Table’s Background Image
To insert a table background image, follow these steps.
1. Place the cursor within the table.
2. Right click the mouse.
3. Select Set Table Properties.
4. Click the Table Properties tab.
5. In the Background Image field, click the ellipsis button ( ) to open the Library. From there, select an image for the table’s background. See Also: Storing Files in the Library
6. Click Update.
Deleting a Background Image
1. Place the cursor within the table.
2. Right click the mouse.
3. Select Set Table Properties.
4. Click the Table Properties tab.
5. Select the value in the Background Image field.
6. Press <Delete>.
7. Click OK.


![]()